previous
 next
next

The Security Proxy acts provides additional features to authorize users and encrypt session data. Several configuration options are available.
|
|
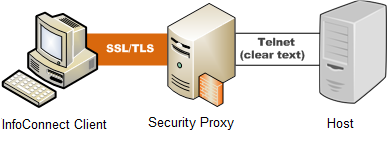
When using the default configuration for the Security Proxy, users are authorized using security tokens. Transmitted data between the client and the Security Proxy is encrypted; transmitted data between the Security Proxy and the host is not. The Security Proxy server should be installed behind a corporate firewall when used in this mode.
|
|
Pass Through |
When configured as a Pass Through Proxy, the Security Proxy passes data to the destination host without regard to content (that is, it ignores any SSL handshaking data). You can secure data traffic using SSL between the client and the destination host by enabling SSL user authentication on the destination host. When using a Pass Through proxy, client authorization is not an option. |
|
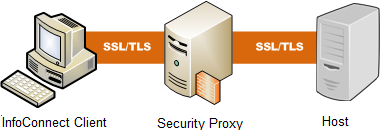
End-to-End SSL/TLS Security |
This option is available for 3270, UTS, T27, and some ALC sessions. It combines user authorization with SSL security for the entire connection. Single sign-on capability using the IBM Express Logon Also referred to as single sign-on (SSO), express logon is an IBM mainframe feature that lets users log on and connect to the host without entering a user ID and password each time. Express Logon authenticates the user on the mainframe by using her SSL client certificate in lieu of entering a user ID and password. is also supported, provided the host supports SSL.
|
Use this procedure to create an InfoConnect emulation session that connects to the Security Proxy and requires a user token for client authorization. Client authorization is a configurable option in Security Proxy that is enabled by default.
This feature is supported for Telnet connected sessions.
Requirements
A Micro Focus Management and Security Server, with a Security Proxy Configured. For end-to-end encryption, the Security Proxy must be configured to require . (It can optionally be configured to require . For client authentication, you can use a single certificate or two separate client certificates on each server (Security Proxy and destination host).
Digital certificates. To successfully establish the SSL/TLS sessions between the client and the Security Proxy, and the client and the destination host, you may need multiple digital certificates. End-to-end connections require two certificates and SSL/TLS handshakes — one for the client/proxy server connection and another for the client/host connection.
On the administrator's workstation, installation of InfoConnect Desktop and a browser (with Java enabled)
To configure an ALC, UTS, or T27 session to use the Security Proxy
Start the Administrative WebStation and launch a session. (See Create Sessions using the Administrative WebStation.)
InfoConnect opens in Administrative WebStation mode.
From the dialog box, select an ALC, UTS, or T27 terminal template and click .
In the dialog box, click to start the Path Wizard. Respond to the prompts for your connection type until you see the following dialog box. (These options appear only when you are running in WebStation mode.)
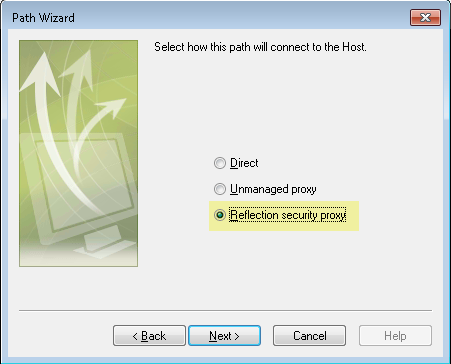
Select and click . You can use the next dialog box to configure your connection to the host through the proxy.
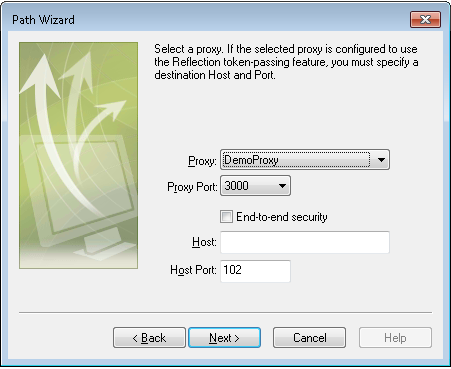
Click and continue through the wizard to complete the configuration. When you click , the session opens in InfoConnect.
Finish configuring your session, then save the new session and close the Workspace.
The session file is saved to the Management and Security Server.
Configure an IBM terminal session to use the Security Proxy
Start the Administrative WebStation and launch a session. (See Create Sessions using the Administrative WebStation.)
InfoConnect opens in Administrative WebStation mode.
From the dialog box, select a 3270 or 5250 terminal template and click .
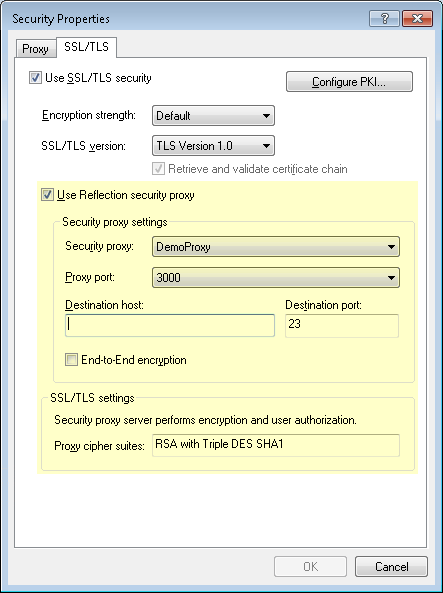
Select the check box , and click .
Under , click , then click .
In the Security Properties dialog box, select , then select . Use this dialog box to configure your connection to the host through the proxy.
Finish configuring your session, then save the new session and close the Workspace.
The session file is saved to the Management and Security Server.