 previous
 next
next
To create customized deployments using the Installation Customization Tool, set up as follows:
To set up the installation files on a server:
Copy the package files that you extract from the download site.
-OR-
Use the Setup program to create an administrative installation point.
When you create an administrative installation point, the files required by the installer are copied to the location you designate and expanded so you can see the file content.
NOTE:An administrative installation point is the recommended format for applying service packs, updates, and hotfixes using the patch utility. When you run the patch utility, it asks for your administrative installation path. If you apply the patch to the original compressed package, the utility won’t overwrite the uncompressed files.
You can create an administrative image using the Setup program user interface or from a command line. If you have already installed InfoConnect on your workstation, you must use the command line to create the Administrative installation. When you start Setup on a system that already has InfoConnect installed, the Setup program detects your installation and presents you with options to repair, reinstall, or remove the product—the option to create and administrative install image is not available
To create an administrative install point using the Setup user interface
NOTE:For this procedure, use only the Advanced and File Location tabs. Configurations made from other tabs will be ignored.
Double-click setup.exe file to start the installation program.
Review and accept the license agreement and click Continue.
From the Advanced tab, select Create an Administrative install point on a server.
Click Continue. This opens the File Location tab. Browse to the location to use for the administrative installation image.
Specify the path to a network share as a UNC path. For example: \\share_name\administrative_install_point.
Click Install Now.
To create an administrative installation point using the command line
Open a Command window.
Run setup.exe using the following syntax:
path_to_setup_file\Setup.exe /install /admin TARGETDIR=UNC_path_to_administrative_installation_point
For example:
c:\icpackage\setup.exe /install /admin TARGETDIR=\\teamshare\infoconnect
You can install InfoConnect by running Setup from your original download location or your administrative installation point.
To install InfoConnect on your workstation
Double-click setup.exe file to start the installation program.
Review and accept the license agreement and click Continue.
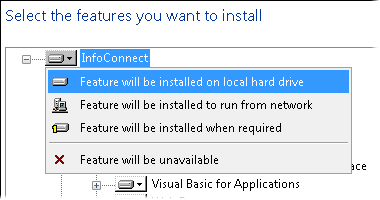
Use the Feature Selection tab to select the features you want to install. To install all features, you can click the arrow on the InfoConnect icon (the top item in the tree) and select Feature will be installed on local hard drive. After you determine which features users require can use the Installation Customization Tool to customized Setup on your installation point to install just those features.

Click Install Now.
NOTE:For this installation, use the default installation option to Install to this PC.
By default, the Installation Customization Tool can be opened only from a command line. To save yourself time starting this tool, you can optionally create a desktop shortcut and set the shortcut properties to open it.
To set up a desktop shortcut
On your administrative installation point, right-click on the setup.exe file and choose Create Shortcut.
Right-click on the shortcut and choose Properties.
In the Target field, add the /admin option to the end of the command line. For example:
\\myServer\adminInstallPoint\setup.exe /admin
NOTE:Make sure that the path in the Target field is referenced with a Uniform Naming Convention (UNC) format. Do not use drive letters in the path name. Using drive letters can cause problems when you try to use the shortcut on other workstations.
Rename the shortcut and save it on the desktops of your workstation and on the server that you are using for your administrative installation point.