Step 3. Install Reflection Desktop version 16 evaluation software.
Now that Management and Security Server is installed and configured for Single Sign-On, you are ready to install the evaluation copy of Reflection Desktop v16.
A. Obtain the Reflection Desktop version 16 evaluation software:
-
On the same machine where Management and Security Server is installed, request the Reflection Desktop version 16 evaluation: https://www.attachmate.com/products/reflection/desktop/desktop-eval-form.html
-
Enter the requested information and click . You will receive an email message with download instructions.
-
Open the Product Evaluation email message and click the link to download the software.
-
Agree to the Terms of Use, and click the file to download now:
rdesktop-16.0.1.308-sp1-eval-w32.exe
-
Note the download location. Rather than installing the product directly, you will create an administrative installation point.
B. Create an Administrative installation image of Reflection Desktop v16.
Use this procedure to create an administrative installation point on a networked file server.
The administrative installation point provides a single location for all of the administrative tools and installation files, including a source image of the application, needed to customize and install Reflection. From there you can customize the deployment for your users.
To create an administrative installation point:
-
Be sure you are logged on to your workstation with administrator privileges to install Reflection Desktop v16.
-
Navigate to the folder where you downloaded Reflection Desktop v16.
-
From the root directory of the installation files, click setup.exe to start the Micro Focus Reflection Desktop Setup Program. Click to install Micro Focus Reflection Desktop.
-
Click and accept the license.
-
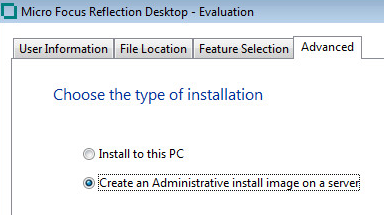
Open the tab and click .
-
Click . The File Location tab is selected automatically.
-
For this evaluation, use the default location, C:\Reflection, for the administrative install image.
NOTE:For testing, you can create the image in any folder on a local hard disk. For production, the installation image would be created on a network drive accessible to user’s workstations, and you need to specify a UNC path for the network share. For example: \\share_name\administrative_install_point
-
Click . Click when the installation is complete.
From this administrative installation point (C:/Reflection), you can enable centralized management and customize the installation’s security settings.
Review your progress
Now that Management and Security Server is installed (Steps 1-2) and the Reflection Desktop v16 administrative installation point is created (Step 3), you are ready to enable Centralized Management so that access to the mainframe can be secured by Management and Security Server.