HA Deployment Blueprint
The following is an example of how to deploy ZFE in a highly available, scalable, and secure manner. While the details of every deployment will differ, the goal here is to provide a known good starting point and to answer common deployment questions.
Architecture
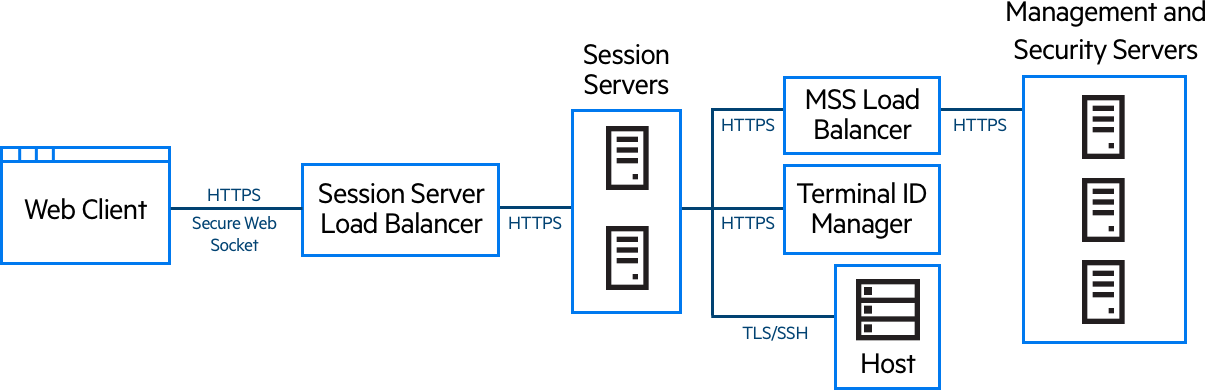
This deployment consists of:
-
Session server load balancer
-
Two session servers
-
MSS load balancer
-
Three MSS servers
-
Terminal ID Manager
-
LDAP or identity management server
-
Host/mainframe
Deployment benefits
With this example, you will see:
-
Capacity for up to three thousand host sessions and the ability to be scaled as needed
-
High availability of key services; minimizing single points of failure and distributing load by means of load balancers
-
The ability to handle the failure of one session server and one MSS simultaneously without a significant drop in the performance of the web client, due to built-in headroom
-
Authentication and authorization options for MSS
-
Secure communication through HTTPS
Steps when deploying
We recommend you follow these steps when deploying:
-
Learn about the basics of deployment
-
Provision resources based on system requirements and sizing guidelines
-
Install MSS and create a cluster
-
Configure MSS load balancer
-
Install session servers
-
Configure session server load balancer
-
Verify deployment
-
Configure single sign-on (optional)
-
Configure Terminal ID Manager (optional)
You’ve learned about the basics of deployment, system requirements and sizing guidelines in previous sections.
Installing MSS
Install three MSS servers and configure each of them for replication. There is documentation that can step you the process:
-
Open ports on the firewall. Ports used by MSS and ZFE are listed here
-
Install MSS and then the ZFE components for MSS by running the ZFE install program on each MSS server.
-
Configure each server for replication.
-
On each MSS server, configure general settings, security settings, and other settings as required.
-
In each MSS container.properties set the management.server.callback.address property to be a resolvable address for the specific MSS server. (for example, mssserver1.mydomain.com. With this property set the MSS server can provide a callback address to the session server when editing sessions and with a load balancer in front of MSS.
Additional resources:
Configuring a MSS load balancer
As described in the Using Load Balancers section of this guide, use these values when configuring the MSS load balancer:
-
Least Connections (or something similar)
-
Enabled - use existing JSESSIONID cookie
- Because cookies are not stored in the session server when it is acting as a client to MSS, the MSS load balancer must use either the existing JSESSIONID cookie or source IP (or something similar) for persistence.
-
https://<mss-server>/
-
Configure TLS and install certificates as needed.
Installing ZFE session servers
Install two or more session servers.
For each session server:
-
Open ports on the firewall. Ports used by MSS and ZFE are listed here
-
Install the session server. During installation, choose to use a remote MSS server, and enter the MSS load balancer address and port.
-
Import the session server certificate into each MSS server’s trust store: trustedascj.bcfks.
HINT:This is done automatically for you on the MSS server that the load balancer chose during installation, but must be done manually on the other servers. It is best practice to import or verify its presence on each MSS server.
Additional resources:
Configuring session server load balancer
Use these values to configure the load balancer:
-
Least Connections (or something similar)
-
Enabled - use JSESSIONID or a new cookie. Unlike the MSS load balancer you are not required to use the existing JSESSIONID cookie.
-
https://<session-server>/zfe/actuator/health
- For the session server in particular, be cautious when you are configuring how to determine a node has failed and what to do once it has failed. If there are users still connected to the instance, those users may lose their host connections. To avoid marking an instance as failed too early, consider increasing timeouts or retries. Some load balancers provide a “drain mode”, which allows existing users to stay connected, but will direct new users to other instances.
-
Configure TLS and install certificates as needed.
Verifying the installation
After installing and configuring all components, you’ll want to:
-
Log into the MSS Administrative Console (through the MSS load balancer).
-
Navigate to Manage Sessions > Add a New Session and create a test session. When you add a new session, specify the session server load balancer for the session server address.
-
Assign the test session to a test user.
-
Log into the session server as the test user, through the session server load balancer.
-
Verify that the assigned session is available, opens, and can connect.
Configuring Single Sign-on (optional)
Following are a few additional considerations when configuring single sign-on in an high availability deployment.
SAML (Security Assertion Markup Language)
The MSS Administrator Guide has SAML Authentication instructions.
-
Import the MSS load balancer certificate into each MSS servletcontainer.bcfks as a trusted certificate.
-
Update the management.server.url in each MSS container.properties file to use the MSS load balancer address.
-
Restart the MSS servers.
-
Log on to the Administrative Console of the active MSS server to configure the SAML Authentication.
- Confirm that the MSS load balancer DNS is used in the field and add the MSS load balancer and ZFE load balancer DNS to the SAML whitelist.
X.509
The MSS Administrator Guide has X.509 Authentication instructions.
In each case the certificate used must have a Subject Alternative Name (SAN) that contains all MSS server DNS names, along with the load balancer DNS name.
-
Verify that the firewall on the MSS server allows HTTP traffic on the mutual authentication port; 8003 is the default.
-
In each MSS:
-
Replace the certificate of the servlet-engine entry in the servletcontainer.bcfks files.
-
Replace the certificate of the system entry in system.bcfks files.
-
-
Import the certificate into each ZFE’s:
-
trustcerts.bcfks file as a trusted certificate.
-
-
Restart the MSS and ZFE servers.
-
Configure both the MSS and ZFE load balancers for TLS passthrough.
-
Configure X.509 authentication as documented here: How to configure X.509 authentication.