 previous
 next
next

The following procedure will enable an administrator to configure and run Databridge with the service on a clustered Windows Operating system. A cluster database provides scalability and data-sharing between multiple compute nodes. This sharing is designed to offer a fault tolerant database with high availability to minimize the effects of a single failure loss of service within your storage architecture.
If you are attempting to install the cluster feature after an unsuccessful install of Databridge version 6.6 please read Uninstalling the Cluster section prior to your installation.
Configuring the First Node
The First Node that you will be installing the client on should be your active node. If it is not the active node you will need to move the client to the active node.
From the Server Manager, expand the tree view features and expand Failover Cluster Manager to list the available clusters. Expanding the cluster to which Databridge will be added, right-click Services and applications in the tree view or select Configure a Service or Application on the right side taskbar to launch the High Availability Wizard.
Click Next on the Before You Begin prompt.
In the Select Service of Application prompt select Other Server from the list and click next as seen in Figure1-1.
Figure 5 High Availability Wizard
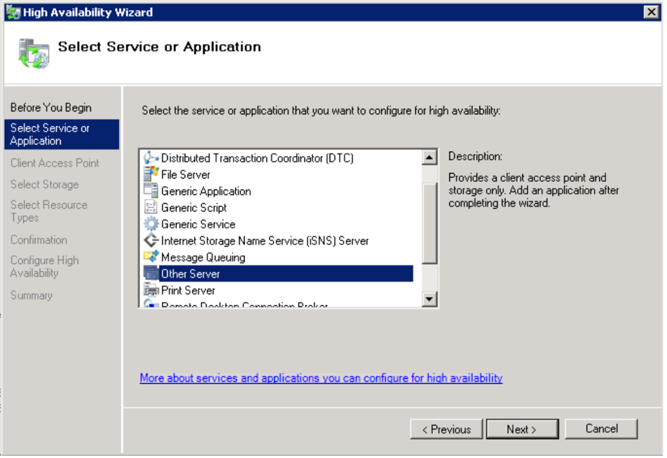
In the Client Access Point prompt enter your desired name for the cluster and configure accordingly with your IPv4 address in the Address field and click next.
When prompted to Select Storage select from the available disks and click next. This disk will be shared by Databridge nodes for configuration and logging.
In the Select Resources Type prompt do not select an option and click next.
Continue through the Confirmation, Configure High Availability, and Summary prompts and select finish.
Install the Databridge Client version on the first node by following the steps in the Installing Databridge on Each Node section.
Installing Databridge on Each Node
Install the Databridge Client version 6.6 and follow the steps below. Ensure the Databridge installation is on the active node per the instructions.
Launch the Databridge setup.exe installer.
In the Feature Selection tab select the Databridge Enterprise Server (optional), SQL Server and Databridge Cluster to be included in the install.
We have selected (“\ProgramData\Micro Focus\Databridge 6.6\Client”) for the Client Working Directory and (“\ProgramData\Micro Focus\Databridge 6.6\Enterprise”) for the Databridge Enterprise Working Directory.
When configuring your Client Service Working Directory and Database Folder set the ports (assigned by a network administrator) and select Install Now.
NOTE:Do not start the service after this step.
Configuring and Installing the Second Node
In the second node, launch the Server Manager.
From the Server manager right-click the newly created application under the Service or applications tree view from Step 4 on your first node.
In the right click menu select Move this service or application to another node and select the second node.
Repeat the Installing Databridge on Each Node steps for the second node. Be sure to configure Databridge with the same Feature Selection and Options as done for your first Node.
After installing and configuring the client do not start the service. Launch Powershell as an administrator and type the following commands:
import-module failoverclusters
add-clusterresourcetype Databridge66 "c:\program files\micro focus\Databridge\6.6\clusterdll\dbcluster.dll" "Databridge Cluster Resource Type"
Return to the Server Manager and click on dbcluster66 located under Services and applications in the left hand tree view. Add dbcluster66 to Other Resources.
Figure 6
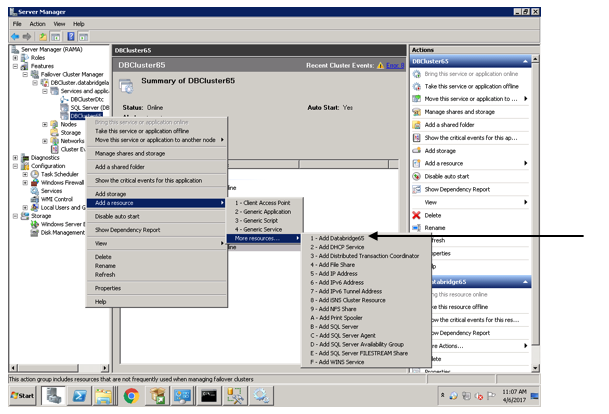
Right-click your created resource and select Properties.
Name the Resource added.
Navigate to the Set Dependencies tab and ensure the dependency is set on the server name and click insert.
Right click your created resource under Other Resources and select the Bring resource on-line option.
Uninstalling Databridge for Cluster Installation
To remove Databridge with the cluster feature, or, if your installation of Databridge with the cluster feature was unsuccessful follow the installation steps outlined to clean your workstation and re-install Databridge with the cluster feature.
Using Server Manager, take DBCluster offline.
Using Server Manager, delete DBCluster.
Using Powershell, remove-clusterResourceType "Databridge66"
On each node that is in DBCluster use Windows Explorer to navigate to Windows\cluster and delete dbcluster.exe.
In the Control Panel uninstall Databridge version 6.6.