Transfer Files
Reflection ZFE supports two different file transfer protocols; IND$FILE for 3270 host transfers and File Transfer Protocol (FTP) which allows a local computer to act as an FTP client. Once connected, you can view files on the server and use the File Transfer Protocol (FTP) to transfer files between your local computer (or any networked drive) and the FTP server.
Batch file transfer is available for FTP transfers. Using this option you can download and upload multiple files in one operation.
Before you can transfer or send files, the administrator must enable the transfer and send options for the current session and make the necessary configurations. This is done on the File Transfer settings panel.
Depending on the host file system and transfer method you want to use, you will see different configuration options. Once configured, the file transfer dialog box is available from the tool bar.
IND$FILE
IND$FILE is a file transfer program from IBM which you can use to transfer information between your computer and a 3270 host computer.
From the drop down list, select which IBM 3270 operating environment the host is running. Reflection ZFE supports TSO (Time Sharing Option), CMS (Conversational Monitor System) and CICS. The default selection is None.
There is support for ASCII or binary transfers and, if you connected to a TSO host, you can navigate directly to a particular TSO dataset.
General options for CICS, CMS, and TSO host file types
- By default, the host file list contains all the host files that are available to transfer. To retrieve host files only when you request them, disable this option. On the Transfer dialog box, click to retrieve the host files.
Transfer options for CICS, CMS, and TSO host file types
|
Option |
Description |
|---|---|
|
Transfer method |
|
|
CR/LF processing |
If this option is selected, carriage return - line feed pairs will be stripped from files sent to the host and added to the end of each line on files received from the host. |
|
Startup command |
Specifies the host program used to initiate the file transfer. IND$File, the default, is appropriate for CMS and TSO hosts. For CICS hosts, IND$File may be appropriate, or you many need to specify your site’s CICS transaction (for example, CFTR). |
|
Startup parameters |
Use this field for any parameters specific to the IND$File program on your host system. The contents of this field are appended to the end of the transfer command generated by Reflection ZFE. Reflection ZFE does not validate the parameters. |
|
Max field size |
Select a field size to use with the Write Structured Field protocol. The default value is 4 kilobytes. Typically, the larger the buffer size, the faster the transfer. Most systems support 8K; if you choose a value that is too large for your host, it will disconnect your session when you first attempt to send a file big enough to fill the buffer. The person who installs the host communication software usually supplies this value. For example, IBM’s host TICP/IP product gets this value from the DATABUFFERPOOLSIZE parameter, which defaults to 8K buffers. See your system administrator if you don’t know what to enter here. |
|
Lead key |
You can specify certain actions before transferring or listing files. Your choices are None, Auto Sense, and Clear. If set to None, LISTCAT is issued automatically. If set to Auto Sense, the current screen contents are examined to determine if a LISTCAT or TSO LISTCAT should be sent. If set to Clear, the Clear key is sent before issuing command. For TSO, Clear also means "TSO" will not be prepended to the request files command. |
|
PC code page |
The character set to use when reading or writing local files during a file transfer. The value uses the code page corresponding to your operating systems locale. If you need a different character set to specify the PC code page, select it from the list. |
|
Host code page |
The character set to use when translating EBCDIC characters while transferring files to or from the host. The default, , uses the national character set specified on the Display panel under Terminal. If you need a different character set to specify the host code page, select it from the list. |
|
Response timeout (seconds) |
Specifies how many seconds Reflection ZFE should wait for a host response before timing out and returning an error. The default value is 60 seconds. |
|
Startup timeout (seconds) |
Specifies the number of seconds Reflection ZFE should wait for a host response when attempting to connect to a host. If the specified amount of time elapses with no response from the host, Reflection ZFE times out and returns an error. The default value is 25 seconds. |
Send options for CICS, CMS, and TSO host file types
|
Option |
Description |
Applies to this host type |
|---|---|---|
|
Record format |
Use this option to specify the record format for files sent to the host.
|
TSO, CMS |
|
Allocation units |
Specifies the disk subdivisions for your primary and secondary space allocations. If you select Default (default), the unit is determined by the host. You can also select Cylinder, Track, or Block. If you select Block, use the Average block box to specify the size for an average block (in bytes). |
TSO |
|
Logical record length |
The record size (in bytes) for the file being created on the host. If you leave this box blank, the record size is determined by the host. You can set any value between 0 and 32767 to accommodate any range accepted by your host. This option is not available on CICS hosts. For ASCII files, set this value to accommodate the longest line in your file. When you leave this box blank, the host usually accepts lines of up to 80 characters. |
TSO, CMS |
|
If host file exists |
Specifies how the transfer should operate if a file with the same name already exists.
|
TSO, CMS |
|
Block size (bytes) |
On TSO hosts, specifies the block size for the file being created on the host. For files with fixed-length records, this value must be a multiple of the Logical record length (because blocks are divided into logical records). You can set any value between 0 and 32767, to accommodate any range accepted by your host |
TSO |
|
Average block (bytes) |
The size for an average block. This value is only relevant if you are using blocks as your allocation unit. |
TSO |
|
Primary allocation (allocation units) |
The size of the primary allocation for the host file being created. |
TSO |
|
Secondary allocation (allocation units) |
The size of any additional allocations in the event that the primary allocation is not sufficient. Multiple secondary allocations (known as "extents") are allowed, up to a host-specified limit (generally 15). |
TSO |
NOTE:When using CICS as the host system you must enter the names of the files you are transferring manually. A list of files to choose from is not available.
Transferring files
You must be connected and logged into the host to transfer files for the current 3270 session.
-
Verify that the host is in a ‘ready’ state to accept the IND$FILE command.
-
From the tool bar, click the icon
 .
. -
The File Transfer dialog box displays, containing a list of host files and directories that are available to transfer. Directories and files are indicated by an icon when you select the file. For CICS hosts, type in the names of the files you want to transfer.
-
Select the transfer method. The options are:
-
Binary
Use for program files and other types of files that should not be translated, such as files that have already been formatted for a particular type of printer or files with application-specific formatting. Binary files contain non-printable characters; using this method, a file is not converted or translated during the transfer.
-
ASCII
Use to transfer text files with no special formatting. ASCII files on the PC are translated to the EBCDIC character set on the host and host text files are converted from EBCDIC to ASCII when they are downloaded.
-
-
If you are connected to a TSO host, click to type in the new dataset you want to view. Reflection ZFE updates the remote file list using the dataset level you specify.
You can refresh the file list at any time by clicking the icon in the upper left corner of the File Transfer dialog box.
Downloading files
-
From the list, select the file or directory to initiate the transfer. You can choose to save or open the files in the format you selected in step 3.
-
If necessary, you can cancel the transfer from the transfer progress panel.
Uploading files
NOTE:IBM mainframe computer systems impose certain naming conventions for files. For detailed information on naming requirements, see the IBM documentation.
There are two methods for uploading files:
-
From the File Transfer dialog box, click .
-
You can specify a different name for the uploaded file. Click , browse to the file you want to upload, and when prompted type the name you want to use.
Or:
-
Drag the file you want to upload from its location to the File Transfer dialog box.
-
Click to verify the file was successfully uploaded.
If you cancel the upload process before a file has been completely transferred, a partial file will be left behind on the host.
Troubleshooting your file transfers
Occasionally you might encounter errors when attempting a file transfer. These errors may be mainframe issues or may be caused by browser security settings.
If a transfer completes but the file doesn’t contain the data expected, verify that the transfer method is properly set to either Binary or ASCII.
For host-specific errors, see IBM File Transfer Error Messages.
FTP
With Reflection ZFE your local computer can act as an FTP client. Using the FTP client, you can connect to an FTP server running on another machine. Once connected, you can view files on the server and use FTP to transfer files between your local computer (or any networked drive) and the FTP server. Using FTP, a client can upload, download, delete, rename, move and copy files on a server, either singly or as a batch transfer, where you can build lists of files to be transferred as one operation.
HINT:If you plan on using a batch transfer, must first be selected and configured.
To configure FTP
Select and proceed with the configuration:
-
Use FTP to start a standard FTP session. Use SFTP to start an SFTP session.
You can set up an FTP client to use the SFTP protocol and perform all operations over an encrypted secure shell transport. Reflection ZFE uses user name and password to authenticate.
-
Specify the host name or IP address of the FTP server to which you want to connect.
-
The port of the FTP server specified.
-
Specify how you want to handle the transfer if a file with the same name already exists. You can select:
This option
Does this...
Append
Append the file being sent to the existing file
Ask user (default)
Prompt for a decision on how to handle the duplicate file name
Cancel
Cancel the file transfer
Fail
Cancel the file transfer and receive a notification of failure
Overwrite
Overwrite the existing file on the remote machine
Skip
When multiple files are in a request, skip the file matching an existing file name, but proceed with the transfer for other files.
Unique
Create a new file with a unique file name
-
Specify the path to a home or default directory for the FTP site. When a connection to the FTP site is opened, the server working directory is set automatically to the specified home path. The files and folders in the server home directory appear in the FTP session window. If the initial remote directory is not found, a warning is reported and the connection continues.
-
Select this option to log onto the specified FTP server as a guest, with the user name “Anonymous”. If the host you are connecting to does not support anonymous users, it may be necessary to supply your credentials.
-
This value tells the FTP client the maximum number of seconds to wait for data packets being transferred to or from the host. If nothing is received within the period specified, a timeout error displays and the transfer terminates; in this case, try the operation again. If you receive repeated timeout errors, increase the timeout value. Entering 0 (zero) in this box prevents the FTP client from ever timing out when waiting for a response. For SFTP sessions, the default is 0 (zero).
-
Select this option and enter a time in seconds if you want to continue your connection to the server beyond the server’s automatic timeout value for inactivity. Most servers have an idle time value that specifies how long a user’s FTP session can last when no activity is detected. When the user exceeds the time limit, the server connection is closed.
This setting allows you to direct the FTP client to send a NOOP command to the server at timed intervals to prevent the server from closing the connection due to inactivity. Be aware that by continuing your session you may prevent another user from making a connection to the FTP server.
-
Specifies the character set used by the host to display the names of files that are transferred. By default Reflection ZFE uses UTF-8 (Unicode). If you transfer files with the default setting and the file names are unrecognizable, change the Host encoding option to the character set used by the host. (This option does not affect the encoding for the contents of the files that are transferred; it applies to the file names only.)
Transferring files
After the administrator configures a session to include FTP functionality, click  on the toolbar to open the FTP File Transfer window containing a list of host files that are available to transfer. Directories and files are indicated by an icon when you select the file.
-
Select the transfer method. The options are:
-
Binary
Use for program files and other types of files that should not be translated, such as files that have already been formatted for a particular type of printer or files with application-specific formatting. Binary files contain non-printable characters; using this method, a file is not converted or translated during the transfer.
-
ASCII
Use to transfer text files with no special formatting. ASCII files on the PC are translated to the EBCDIC character set on the host and host text files are converted from EBCDIC to ASCII when they are downloaded.
-
-
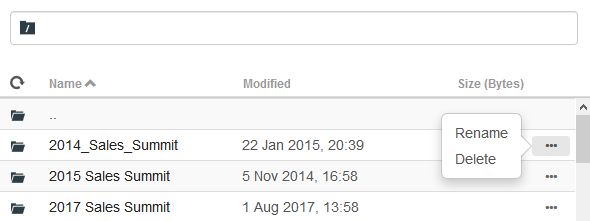
You can rename, delete, or download a file from the list of files.
-
Refresh the file list at any time by clicking the icon in the upper left corner of the File Transfer dialog box.
Downloading files
-
From the list, select the file to initiate the transfer.
-
If necessary, you can cancel the transfer from the transfer progress panel.
Uploading files
There are two methods for uploading files:
-
From the File Transfer dialog box, click .
-
Choose the file you want to upload from the Browse window.
Or:
-
Drag the file you want to upload from its location to the File Transfer dialog box.
-
Click to verify the file was successfully uploaded.
Click to create a new directory on the remote server. You are prompted to enter the new directory name.
Batch transfers
NOTE:You must first enable FTP on the File Transfer settings panel FTP tab before you can configure batch transfers.
To transfer multiple files in one operation, use the option.
-
From the Settings > File Transfer > FTP panel, check .
-
Click
 to open the file transfer panel.
 -
Select to stop the transfer if a file fails to transfer.
-
Click
 to create the list of files you want to transfer.
-
Name the list. To aid in building similar lists, you can copy an existing list, rename it, and then add or delete files as needed using the options available when the original list is highlighted.
-
From the right panel, click
to open the dialog box.
-
-
On the panel, begin building the list:
Option
Description
Transfer
Choose whether to upload or download the file.
Local file name
Identify the file you want to transfer. You can enter the name of the file or browse to it.
Remote file path
Provide a location to name and store the file after transfer. You can:
-
- leave the field blank
-
- enter newfilename.txt. Puts the file in the initial remote directory using the given name.
-
- /folder/. Uses the original file name with the new path.
-
- /folder/newfilename.txt.
Transfer method
You can choose from Binary or ASCII transfer methods.
If remote file exists
Decide how to handle file transfer if a remote file already exists. The options are:
-
Overwrite (default) - Overwrite the existing file on the remote machine
-
Append - Append the file being sent to the existing file
-
Ask user - Prompt for a decision on how to handle the duplicate file name
-
Cancel - Cancel the file transfer
-
Fail - Cancel the file transfer and send notification of the failure
-
Skip - The file matching an existing file name is skipped, but the transfer proceeds for the other files in the batch
-
Unique - Create a new file with a unique file name
-
-
Click .
Transferring files
HINT:Administrators grant permission to transfer files using the option from the Settings panel.
Click  on the tool bar to open the list that contains the files you want to transfer.
-
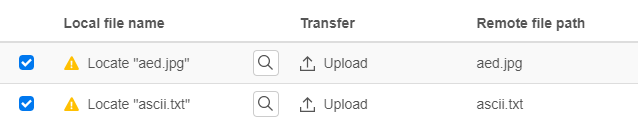
Due to browser requirements, you need to specify the location of all files that you want to upload. Locate files as needed using the Search icon. Those files are easily identified with a yellow icon as such:
-
Files in the batch list are selected by default. To edit the file prior to transfer, you can eliminate files from the transfer operation by clearing their respective check boxes, or by selecting from the drop down menu. You can also filter the list of transferable files based on their download or upload status.
-
Click to initiate the transfer.