3.2 Create, Deploy, and Test a TLS 1.2 Session
In this section, you will create a TLS 1.2 session and then test the “before” security settings — before the workstation is locked down.
Steps in this section:
________________________________________________________________________________
3.2.1 Step 6. Create a Windows-based 3270 session that uses TLS 1.2.
The administrator’s company requires secure access to the mainframe. To meet this requirement, create a session to an IBM 3270 host, using both Management and Security Server and Reflection Desktop.
-
Log off Windows as the domain user, and log on as the administrator.
-
Open , and log on as the Management and Security Server administrator.
-
The opens to the panel.
-
Click .
-
Select as the Product, and as the Session type.
-
Enter a , such as 3270-TLS.

-
Add a comment for internal reference, if desired.
-
Accept the default settings and click . Reflection Workspace launches in a separate window.
-
In Reflection Workspace, create a new document using the . Click .
-
In the Create New 3270 Terminal Document dialog, enter the of a TLS-enabled host name and the appropriate .
If you cannot connect with TLS, enter the name of another mainframe host. You will not be able to evaluate the exact behavior on your system, but you can follow along.
-
Check (at the bottom), and click .

-
In the Settings for 3270 dialog under Host Connection, click . Scroll to and click . (If prompted, disconnect the session.)

-
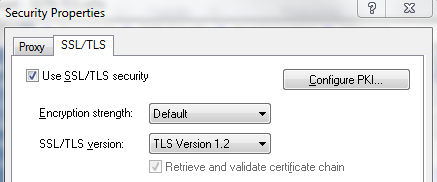
On the SSL/TLS tab:
-
Check , and keep the Default Encryption strength.
-
In the SSL/TLS version drop-down menu, select .
-
Click twice. The session is now configured.
As mentioned earlier, if you cannot connect with TLS, you will not be able to evaluate the exact behavior on your system, but you can follow along.
-
-
In Reflection Workspace, click > . Click to send the settings to the Administrative Server.
For this evaluation, you do not need to send it as a compound session.
(When the session is sent as a compound file, all of the custom keyboard maps and other settings that apply to that session are saved in the session file. Compound files simplify the deployment process because you do not have to deploy these settings in separate files.)
-
Reflection Workspace. You are returned to the Administrative Console in Management and Security Server.
Review your progress
The security settings are configured (Steps 4, 5), and the session to the mainframe is created (Step 6). Now you can “push” the settings to the domain user.
3.2.2 Step 7. Deploy the session to the domain user’s workstation.
In Management and Security Server, use to authorize the domain user to access the mainframe session.
-
In the Administrative Console, open . Or, if the Session Saved page is still open, click .
-
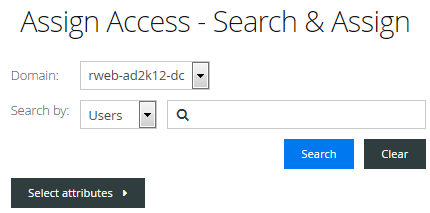
For this evaluation, deploy the 3270-TLS session to the domain user. Because you are using LDAP for authorization, you can for users and groups.
To find the user, enter a user name, a group or folder name, along with an asterisk (*) wildcard, or a combination of * and letters. Click .
Note: If you are not using LDAP, the only option is to deploy the session to all (or no) users.
-
On the same panel, verify that the correct user name is displayed
-
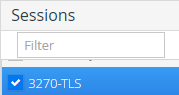
Then, in the list, check your session, 3270-TLS, to grant access to that domain user.
-
Click .
Now, when that domain user opens Reflection Workspace, they will see the 3270-TLS session.
-
Log off as administrator.
Review your progress
The companion package is installed on the user workstation, with settings to enable Centralized Management in the Reflection Workstation and to display the Open dialog box when the Workstation first opens.
The completion of Steps 1–7 meet the company requirements to ensure that:
-
Only authorized users are allowed access to the mainframe applications.
-
All sessions are connected over a secure protocol.
3.2.3 Step 8. Test the deployment.
Test the initial deployment and make note of what the user can and cannot change.
-
Log on as the Windows domain user.
-
Click > > > .
When the domain user launches Reflection Workspace, any sessions made available to that user using Management and Security Server are downloaded to the users documents folder.
Notice that Reflection Workspace opens and presents the dialog (that you configured earlier).
-
Find and double-click the 3270-TLS session you created (in Step 6).
-
Note the default security settings for :
-
Open (File > Settings > Reflection Workspace Settings).
-
Under Trust Center, click , and scroll to .
NOTE:The first three check boxes under Primary Account Number (PAN) Redaction Rules are not checked for this user. (These settings will be modified in a future step.)
Click OK.

-
-
View the (from Step 6):
-
Click File > Settings > Document Settings, and under Host Connection, click .
-
Scroll to and click .
NOTE:Although the setting is checked, the user could change the setting.
-
Review your progress
When you tested the initial deployment (Step 8), you observed the “before” settings – before access to the company’s mainframe applications is locked down.
Now the administrator needs to restrict the end user’s ability to change the security settings and thereby lock down the workstation.
________________________________________________________________________________